dsh-a2a
English | 中文文档
一个 DeepSeek Harness (DSH) 插件,实现 Agent2Agent (A2A) 协议 v1.0(Linux 基金会,a2aproject/A2A,Apache-2.0)。
让一个 DSH 实例成为完整的 A2A 双端节点:
- Client 模式(出站)——通过远程 Agent 的 AgentCard 发现它,把每个 skill 映射为 DSH 模型工具(
a2a__<name>__<skill>),通过 A2A JSON-RPC 执行远程任务。 - Server 模式(入站)——把本 DSH 暴露给其他 Agent:在 DSH webserver 上提供
/.well-known/agent-card.json与 JSON-RPC 端点(SendMessage、GetTask、ListTasks、CancelTask、基于 SSE 的SendStreamingMessage)。
安装
一行命令装进 profile,重启即生效:
dsh plugin --profile web add @ryubyte/dsh-a2a
dsh --profile web
dsh plugin 会把包装进 profile 并自动加入插件层(本包在 package.json 里声明了 dsh.bundle.patch),无需手动改任何配置。
截图
| 连接的 Agent(本 DSH 作为客户端) | 对外服务(本 DSH 作为 Agent) |
|---|---|
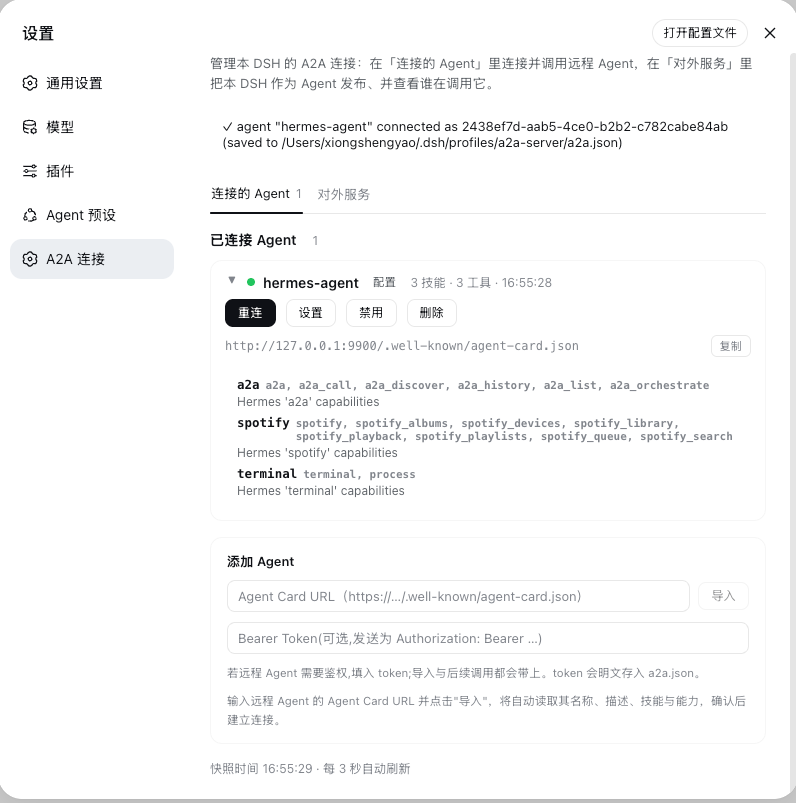 |
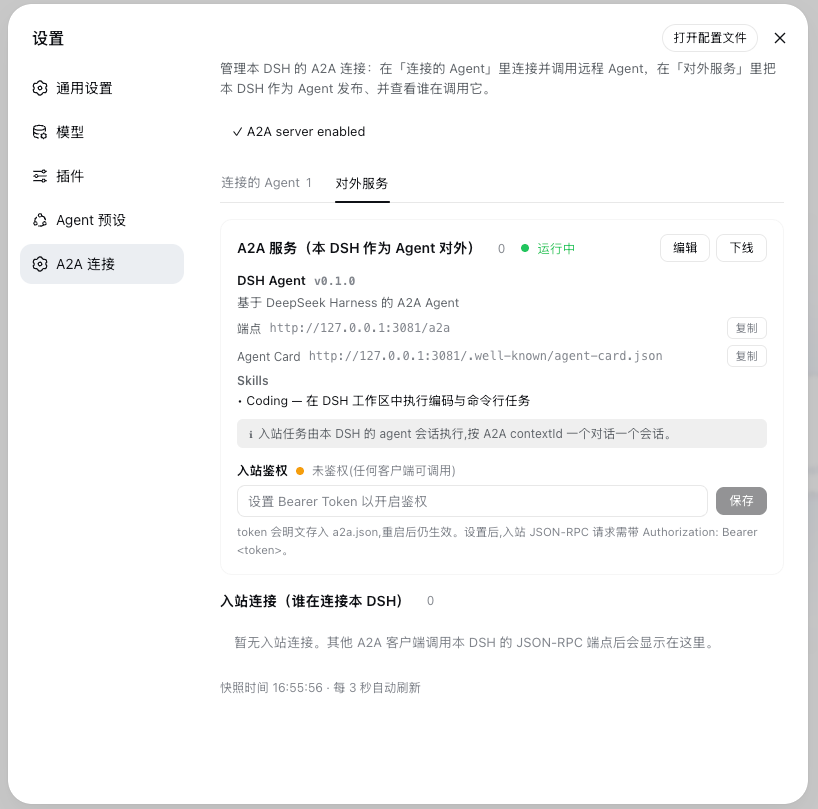 |
功能
协议能力(A2A v1.0)
- 发现:
GET /.well-known/agent-card.json(优先 well-known,配置的 URL 兜底) - 单次调用:
SendMessage、GetTask、ListTasks、CancelTask、GetExtendedAgentCard - 流式:
SendStreamingMessage(SSE)/SubscribeToTask,含TaskStatusUpdateEvent+TaskArtifactUpdateEvent - 任务生命周期:
SUBMITTED → WORKING → COMPLETED / FAILED / CANCELED / REJECTED / INPUT_REQUIRED / AUTH_REQUIRED - 鉴权:出站按 Agent 配置 Bearer Token(
Authorization: Bearer …);入站可选共享 Bearer Token 保护端点——配置后 AgentCard 声明bearerAuth安全方案,未带/错误 token 的请求返回 401(单次调用与 SSE 流均生效) - 类型:
Task、Message、Part(text/raw/url/data)、Artifact、AgentCard、安全方案、扩展
连接面板(设置 → A2A 连接)
面板按角色分为两个 tab,全部配置都可在 UI 里完成,无需手改 a2a.json:
「连接的 Agent」(本 DSH 作为客户端,出站)
- 列出已连接的远程 Agent(名称、连接状态、AgentCard URL、技能/工具数、最近活动),展开可看每个 skill 的名称/标签/描述;每个 Agent 支持 重连 / 设置 / 禁用 / 删除(已禁用的 Agent 显示为灰化占位卡,操作按钮变为 启用)。
- 设置:就地编辑该 Agent 的 超时(timeoutMs)、技能拆分(mapSkills)、Bearer Token,保存后自动以新配置重连生效。
- 添加 Agent:填 AgentCard URL(可选 Bearer Token)→「导入」预览远端名称/描述/技能 →「连接」。配置写回
a2a.json。
「对外服务」(本 DSH 作为 Agent 对外,入站)
- 服务身份可视化编辑:只读展示服务名/描述/版本、端点、Agent Card URL(一键复制)与 Skills;点「编辑」就地改这些字段并完整增删改 Skills,保存即时重建 AgentCard 生效(无需重启)。
- 引导式初始化:全新安装(无
a2a.json)时,本页显示预填好合理默认值的表单,用户按需修改后点「创建并上线」即可发布服务——一步生成a2a.json并启动。 - 上线 / 下线 开关;显示 入站任务由谁执行(自定义 executor / 本 DSH agent 会话 / 未配置)。
- 入站鉴权:设置或清除保护入站端点的共享 Bearer Token(持久化到
a2a.json,实时生效)。 - 入站连接:谁在调用本 DSH(来源、地址、首/末次连接、任务数、流式标记),支持关闭。
- 面板每 3 秒自动刷新;
/a2a/api提供 JSON 快照与控制接口,受 loopback/same-origin 保护(token 值不会通过快照回传,只暴露「是否已配置」)。
运行时配置(a2a.json)
配置以 a2a.json(按 profile 存放,可完全通过 UI 管理)为准,无需改动组合配置即可管理 Agent 与对外服务。文件定位不依赖启动目录:插件解析进程命令行里的 --profile <name>(dsh web 别名同样识别为 web profile),读写 ~/.dsh/profiles/<name>/a2a.json——UI 首次生成的配置也会写到该 profile 目录,从任意工作目录启动都能读到。手写 a2a.json 仍然支持(见下文),但新用户完全靠 UI 即可完成配置与上线。
使用
1. 配置远程 Agent(出站)
在 profile 目录下的 a2a.json 里声明要连接的 Agent:
{
  "agents": [
    {
      "name": "research",
      "agentCardUrl": "https://research.example.com/.well-known/agent-card.json",
      // "bearerToken": "...",
      // "timeoutMs": 8000,
      // "mapSkills": true,
      // "enabled": false        // 保留条目,但不自动连接
    }
  ]
}
也可以在 Web GUI「设置 → A2A 连接 →『连接的 Agent』→ 添加 Agent」里输入 AgentCard URL 导入并连接,配置会写回 a2a.json;连接后点该 Agent 的「设置」还能调整超时、技能拆分与 Token。
连接成功后,对方 Agent 的 skills 会作为模型工具出现:a2a__<name>__<skill>。
同一个本地 agent 会话对某远程 Agent 的多次工具调用会复用同一个 A2A contextId,因此在远端落到同一会话、具备跨轮记忆;不同本地会话相互隔离,各自独立对话。
2. 对外提供 A2A 服务(入站)
推荐:直接用 UI。 打开「设置 → A2A 连接 →『对外服务』」,全新安装会显示预填好的表单,改几个字段后点「创建并上线」即可——无需手写下面的 JSON。以下为等价的手写配置,供了解字段或脚本化部署时参考。
也可以在 a2a.json 里手动开启 server 模式:
{
  "mode": "server",
  "server": {
    "enabled": true,             // 显式开启入站服务
    // "baseUrl": 省略即自动推导(见下),仅反向代理/公网域名时才需显式设置
    "agentName": "My DSH Agent",
    "agentDescription": "A DSH agent over A2A v1.0",
    "agentVersion": "0.1.0",
    "skills": [
      { "id": "coding", "name": "Coding", "description": "Execute coding and shell tasks.", "tags": ["coding", "shell"] }
    ]
  }
}
baseUrl 留空(或在 UI 里清空)时,AgentCard 会按 webServer 的真实监听地址自动推导,不会公布过期端口;仅当本 DSH 位于反向代理或公网域名之后、对外地址与本地监听不同时,才需要显式填写。
关于
mode:mode(client/server/both)控制启动时挂载哪一半,缺省为client。它是可选的——server.enabled: true或存在agents就会分别启用对应半区,所以通过 UI 生成的a2a.json通常不写mode,仅靠这些字段隐式推导行为。手写时显式写mode更直观,二者等价。
之后其他 A2A 客户端通过自动推导出的 http://<host>:<port>/.well-known/agent-card.json 发现本 DSH,通过 /a2a 端点调用。
入站任务由谁执行(executor 优先级)
server 模式收到任务后,按以下优先级选择 executor:
- 显式
execute(通过 composition 配置注入)—— 用你的。 - 本 DSH 的 agent 会话(默认,当 agent 循环就位时)—— 按 A2A
contextId一个对话一个会话:某contextId首个任务ctx.agents.create()建会话(后续同contextId复用同一会话,历史累积;进程重启后按需resume),把消息作为next-turn唤醒项发给它,等whenIdle(),取最新 assistant 回复作为 A2A artifact。同一contextId的并发任务按序串行,不同contextId并行。会话不逐任务释放(否则无法累积上下文),插件卸载/下线时统一释放。开 server 即可「接收并处理任务」,无需写代码。 notConfiguredExecutor(兜底)—— 既没注入execute、composition 里又没有可用 agent 循环(如仅 dsh-base 的最小 profile)时,返回「no executor configured — inject one」,不执行任何命令。
关于「就位」:
ctx.agents(registry)存在 ≠ 能创建 agent。create()需要 agent-loop 插件注册的 factory;缺 factory 时create()会 reject,此时 DSH agent executor 会把它作为可读错误返回(而非抛出)。因此最小 profile 仍需显式注入 executor。会话与工作区:DSH 会话在创建时把
cwd校验为绝对路径并冻结进会话头。入站会话用专用目录<profile>/.a2a-sessions作为 cwd(与 profile 根分开,避免入站会话挤占你的交互会话)。它们出现在会话列表的「未分组」里,并按首条消息摘要命名为A2A: <摘要>(入站消息带 plugin 来源,DSH 的自动标题只认 human 消息,故显式命名)。命名是装饰性的,失败只记日志、绝不影响任务。取消:
CancelTask会 abort 正在运行任务的 executor 信号,真正中止 agent 回合(不只是改任务状态)。本机自测也可显式传入
shellExecutor(把 prompt 当作 shell 命令执行,仅限可信客户端);生产请置于 TLS 反向代理之后并按需配authToken。
目录结构
src/
  protocol.ts        # A2A v1.0 类型与常量
  card.ts            # AgentCard 发现 / 校验
  jsonrpc.ts         # JSON-RPC 2.0 + SSE 传输
  client.ts          # 出站客户端(A2AClient)
  server.ts          # 入站服务 + TaskStore(A2AServer)
  outbound.ts        # skill → 模型工具桥(registerAgentTools)
  dashboard.ts       # 连接注册表 + 控制
  a2a-config.ts      # 运行时 a2a.json 解析 / 持久化
  index.ts           # Cordis 插件入口(client / server 两种模式)
  client/
    index.ts         # 浏览器半区:设置页「A2A 连接」面板
lib/                 # 构建产物(index.js + client.js + types/)
scripts/
  build-client.mjs   # 客户端 bundle 包装(__ModuleLoader__)
  capture-shots.mjs  # README 截图抓取(headless Chrome + CDP)
cordis.patch.yml     # 插件注册行(bundle 自挂载,无需手动配置)
package.json         # dsh.bundle.patch + dsh.client 清单
工作原理
- 插件在
ctx.inject(...)/ctx.effect(...)内读取ctx.webServer与ctx.tools(原生 Cordis 模式,与dsh-client-hmr等 bundle 一致);缺少任一半的组合只会闲置该半区,不会崩溃。 - server 模式
baseUrl可选:省略时 AgentCard 公布 webServer 的真实监听地址,临时端口不会发布过期 URL。绑定127.0.0.1时公布该回环地址;绑定0.0.0.0时自动推导本机 LAN 地址(供远程 Agent 可达),无法推导才退回127.0.0.1。仅在反向代理前置时才需显式设置。 - 客户端模式的连接生命周期钩子(
onReady/onDispose)上报到进程级共享注册表;多个实例(client + server)共用,/a2a/api每个进程注册一次。 - 所有注册 fiber 作用域化:插件停止 / 更新时由 Cordis 自动清理。
- 禁用(
enabled:false)的 Agent 显示为灰化占位卡,不自动连接,直到重新启用。
已知限制
- 面板 API(
/a2a/api)只监听 loopback / same-origin,供运维可见性使用,不承载机密。 - 入站服务的执行策略见入站任务由谁执行:有 agent 循环时默认由本 DSH 会话执行(绑定工作目录 cwd),否则(且未注入 executor)拒绝执行并返回「no executor configured」。
shellExecutor仅限本地自测。无论哪种 executor,都切勿向不受信网络暴露 server 模式(默认无鉴权,除非配置authToken)。 - A2A 规范要求生产
AgentInterface.url使用 HTTPS;DSH webServer 默认仅绑 loopback,对外暴露前需自行加 TLS。 - Bearer token(出站按 Agent 配置的、入站保护端点的
authToken)均明文存于a2a.json,请自行保证该文件权限。
还没有评论,来写第一条。