dsh-computer-use
macOS computer-use plugin for DeepSeek Harness. It registers seven computer_* tools: computer_permissions, computer_screenshot, computer_windows, computer_mouse, computer_keyboard, computer_read and computer_act.
- Screen reading —
computer_readreturns the accessibility tree (role, title, value, actions, screen coordinates, stableindex) and Vision OCR text with coordinates in one call. - Semantic actions —
computer_actpresses / focuses / sets values / clicks an element byindexor by visible label through the accessibility API, so it can drive a background window without moving the real pointer. Each action carries a role+title+position fingerprint and re-locates the element when the tree shifts between calls. - Pixel path —
computer_screenshotcaptures the display, a window or a region;computer_mouseandcomputer_keyboardsend real CoreGraphics events for canvases and apps that expose no accessibility elements.
Screenshots use /usr/sbin/screencapture; mouse, keyboard and accessibility work is done by a single Swift helper (native/ComputerUse.swift) that is compiled with xcrun swiftc on first use and cached under ~/.dsh/computer-use/bin/, so there is no runtime dependency to install. macOS only. Requires the Accessibility and Screen Recording permissions for DeepSeek Harness.
给 DeepSeek Harness 的 macOS「电脑操作」插件:Agent 能截屏看见桌面,并用原生 CoreGraphics 事件移动鼠标、点击、拖拽、滚动、打字和按快捷键。
实际跑起来的样子
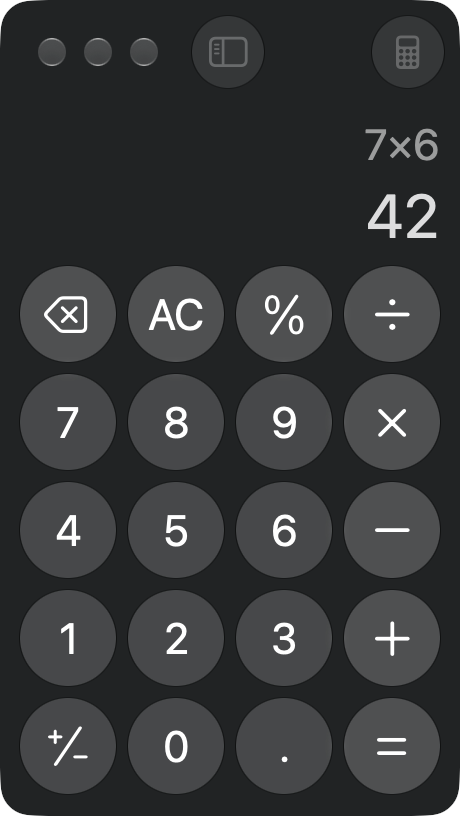
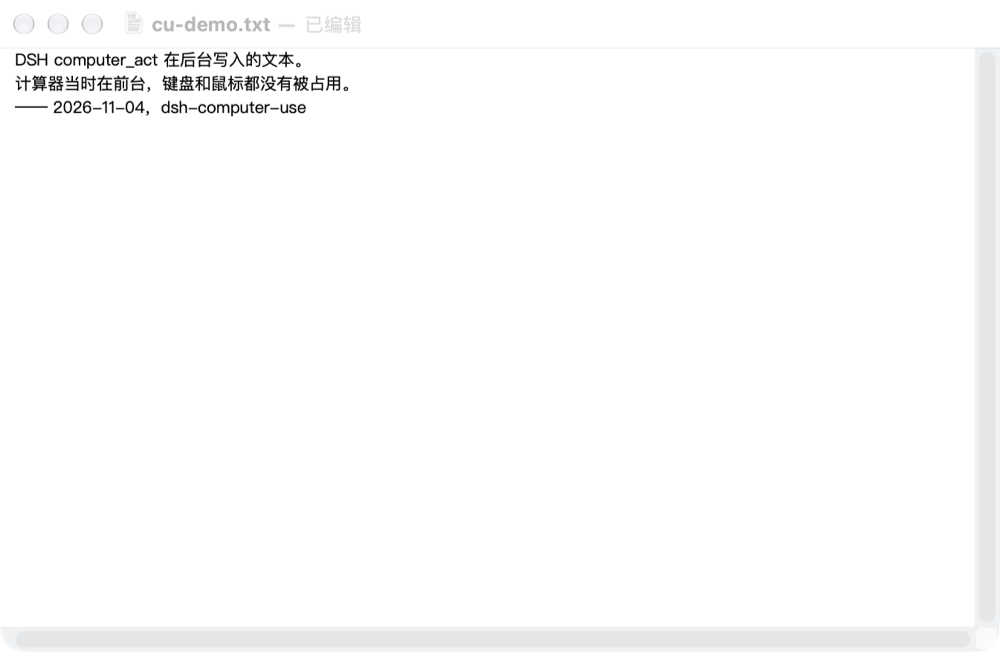
下面两张是真实运行截图,截取自本机 macOS 27:Agent 先用 computer_read 读屏、再用 computer_act 操作,然后回读结果。
| 计算器:读屏 → 按标题点击 → 回读 | 后台窗口:不抢焦点直接写 |
|---|---|
 |
 |
用 computer_act 依次 press 7、乘、6、等于(按可见标题,不按坐标),再用 computer_read 读到 7 × 6 与 42。 |
TextEdit 在后台(前台是计算器)时,computer_act action=set_value 直接写入文本;之后 osascript 回读一致。 |
第三张:OCR 通道。 下图里的文字全部来自一张 PNG(用 Preview 打开),辅助功能树里没有任何文本节点。computer_read 用 Vision 逐行识别,并把每行的 x / y / width / height 一起返回——红框和编号是按真实返回坐标画出来的,不是示意图:
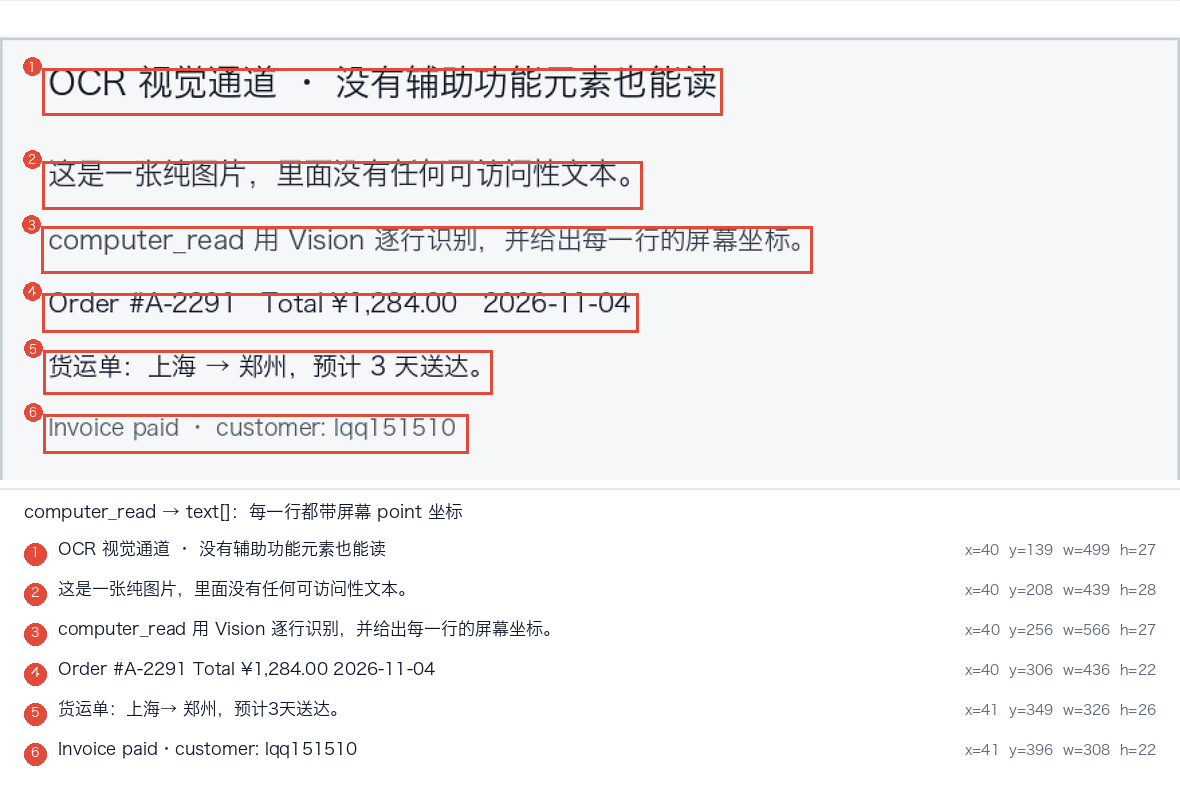
坐标是屏幕 point,可以直接交给 computer_mouse 的 centerX / centerY,也可以先按文字判断这一行是什么、再决定点不点。
它注册了什么
| 工具 | 作用 |
|---|---|
computer_permissions |
检查「辅助功能 / 屏幕录制」授权,缺哪个、去哪开 |
computer_read |
读懂屏幕:辅助功能树(可点元素 role/标题/坐标/index)+ OCR 文字(带坐标),一次拿到 |
computer_act |
按 computer_read 的 index 或标题直接 press / focus / set_value / click,不靠猜坐标 |
computer_screenshot |
截全屏 / 窗口 / 区域,图片直接进模型上下文(需要看像素时用) |
computer_windows |
列出窗口、查前台 app、把某个 app 切到前台 |
computer_mouse |
move click double_click right_click drag scroll position |
computer_keyboard |
type(含中文)key(return/tab/esc/方向键/F 键)hotkey(cmd+shift+t) |
推荐工作流:先读屏,再动手
computer_read:拿到elements(每个带index和centerX/centerY)和text(OCR 行 + 坐标);- 能按语义操作就
computer_act action=press target=<index>(走 AX,后台窗口也能点,不怕遮挡); - AX 里没有的控件,再用
computer_mouse按坐标点,用computer_keyboard打字; - 改完再
computer_read一次复核结果(比如读输入框 value、读计算器显示)。
computer_act 带「元素指纹」(role + 标题 + 坐标):界面在两次调用之间变了导致 path 漂移时,会重新按指纹在树里找同一个控件,而不是点错按钮。
坐标统一是 屏幕 point 坐标,原点在主屏左上角。截图默认降采样到 point 尺寸,所以「图上的像素」就是「点击的 point」;返回值里还带 origin 和 pointsPerPixel 用于窗口/区域截图换算。
与同类插件有什么不同
Dsh 插件列表里已经有好几个 macOS 电脑操作插件(辅助功能优先的、视觉优先的、包一层 Cua Driver 的都有)。下面只列出本插件在实现上做的取舍,方便判断是否合用,不是在比较谁更好:
- 读屏是一个工具,不是一条流水线:
computer_read一次返回「辅助功能树 + OCR 文字」,两条通道共用同一套屏幕 point 坐标,模型不用先选通道,也不用自己做两套换算。 - 按语义操作,不靠坐标碰运气:
computer_act用index或可见标题在 AX 里定位元素后press/focus/set_value/click,过程中不移动真实指针;每次操作带 role+标题+位置指纹,界面在两次调用之间变化时按指纹重新找同一个控件(上面计算器截图里,清除按钮标题在AC/C之间变化,就是靠这条继续点中的)。 - 可以写后台窗口:
set_value直接作用于目标 app 的 AX 元素,不要求它在前台(第二张截图)。 - 没有外部运行时:不打包 DMG、不拉 driver 进程、仓库里也没有预编译二进制——Swift 助手在首次调用时由本机
swiftc编译(约 120 KB,源码可审计),之后按源码哈希缓存。 - 失败时说下一步怎么做:定位不到元素返回
element-not-found并建议重新读屏或改用坐标;权限缺失直接说是哪一项、去哪个系统面板开。
授权(一次性)
系统设置 → 隐私与安全性:
- 辅助功能(Accessibility) —— 发送鼠标/键盘事件必需;
- 屏幕录制(Screen Recording) —— 截图必需。
勾选 DeepSeek Harness 后重启 Harness。跑一次 computer_permissions 就能看到是否齐全;传 openSettings: true 会直接打开对应面板。
当前这台机器两项都已授权,装完即可用。
原生助手
native/ComputerUse.swift 是唯一的原生部分,首次使用时用 swiftc 编译到 ~/.dsh/computer-use/bin/dsh-cu,按源码哈希缓存,升级插件会自动重编。找不到编译器时工具会返回「先跑 xcode-select --install」而不是静默失败。
它刻意不依赖 pyautogui / cliclick / robotjs:一个 ~120 KB 的静态 Swift 可执行文件,只链 AppKit/CoreGraphics,命令通过 argv 传 JSON、stdout 回 JSON。
配置
cordis.patch.yml 里可调:
- id: computer-use
  name: dsh-computer-use
  config:
    allowInput: true       # false = 只截图,禁用鼠标键盘
    resolution: points     # points(推荐)| pixels
    defaultDisplay: 1
    blockedApps:           # 这些 app 在前台时拒绝发送输入
      - 1Password
      - Keychain Access
    typeMaxChars: 8000
    warmup: true           # 启动时后台预编译助手
边界与已知限制
- 只实现 macOS;其他平台工具会直接说明不支持。
- 输入是「全局合成事件」,发给当前前台窗口,插件不会切窗口——先用
computer_windows确认、必要时activate。 type走 Unicode 事件直接插入文本,不经过输入法候选;对个别只认物理键位的游戏/远程桌面可能无效。- AX 不是万能的:自绘界面(部分 Electron / 游戏 / 画布)可交互元素很少,这时退回 OCR + 坐标点击。
computer_read的 OCR 默认zh-Hans + en-US、精确模式、原分辨率;窗口级约 0.3–1 秒,整屏可能要十几秒。只要文字不问像素时用它,别用截图硬猜。- OCR 语言顺序有讲究:
zh-Hans必须在最前,en-US在前会让中文识别质量暴降。 - 截图默认落在
$TMPDIR/dsh-computer-use/,20 分钟后自动清理。
改完代码怎么生效
插件是 link: 进 profile 的,改 lib/*.js 后需要重新加载一次:
# 在 DSH 里调 plugin_manager:
#   action=set_plugin target=include:computer-use enabled=false
#   action=set_plugin target=include:computer-use enabled=true
(原生 Swift 改动不用重载插件:lib/helper.js 按源码哈希自动重编译。)
卸载
dsh plugin --profile desktop remove dsh-computer-use
rm -rf ~/.dsh/computer-use
No comments yet. Be the first to write one.