DeepSeek Files Panel · DSH 上传文件管理面板
为 DeepSeek Harness(DSH)Web 界面提供的一个右侧可折叠侧边栏:列出、查看并清理你的 DeepSeek 账号通过 Files API 上传的图片,支持复用已上传文件的快速管理。
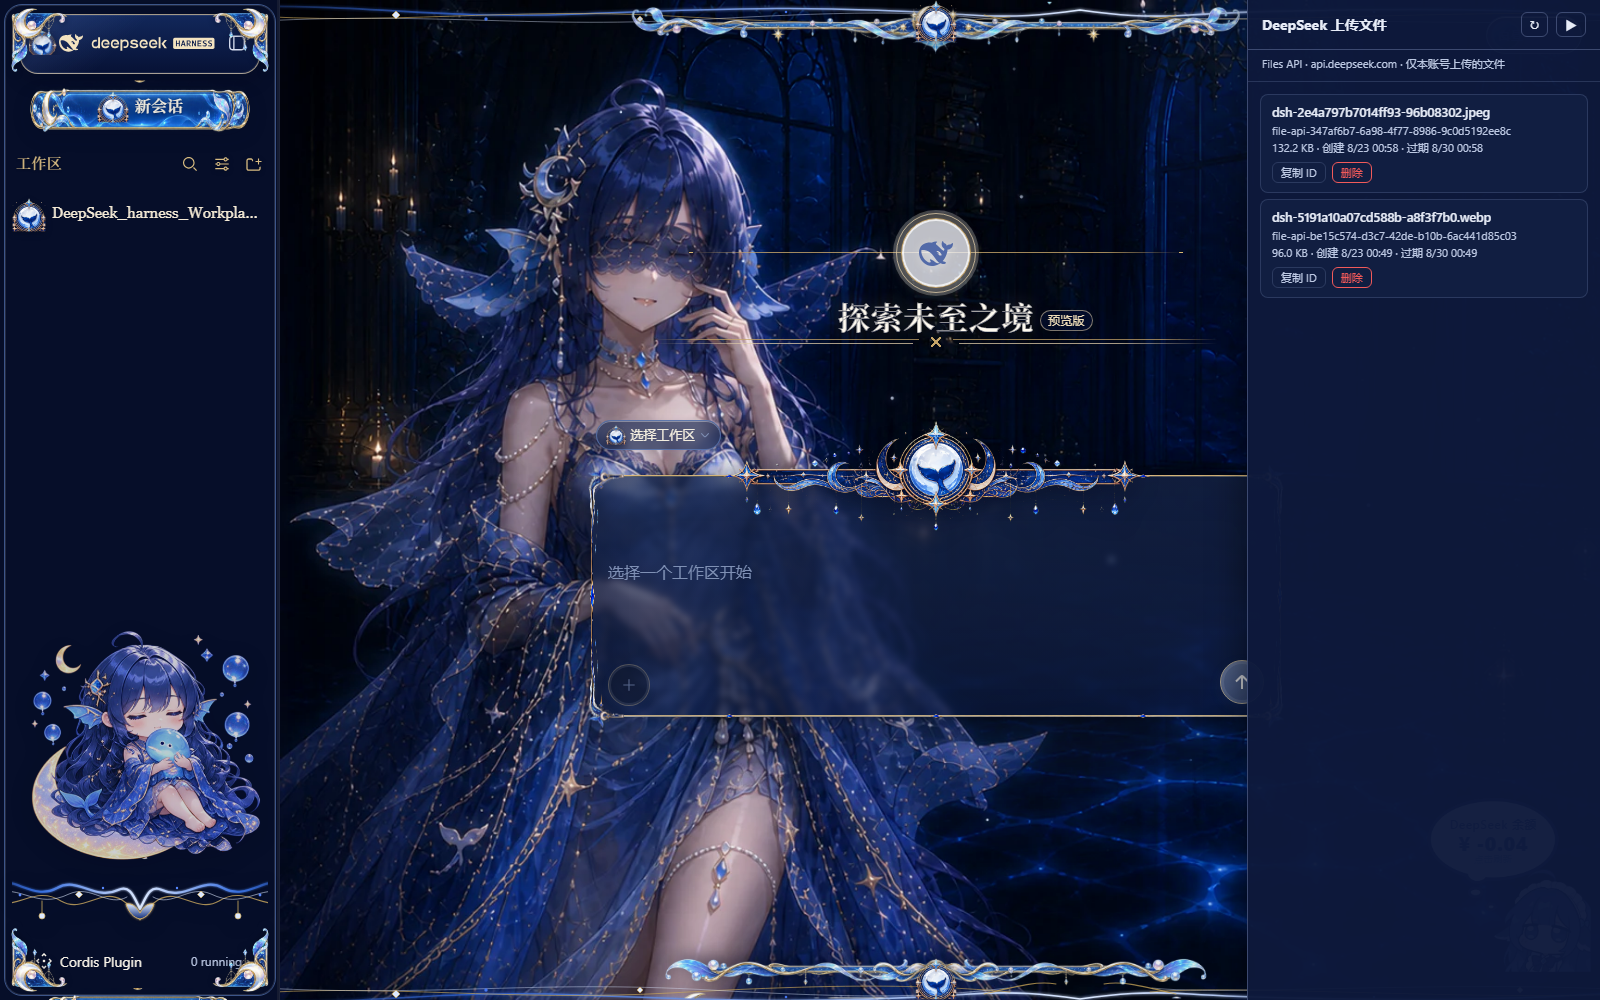
折叠为右侧竖排手柄(📁 DeepSeek 文件),点击展开;也可用 ?dsf-open=1 直达展开态。
功能
- 📋 列出全部已上传文件:文件名(DSH 自动命名
dsh-<内容哈希>.<ext>)、file_id、大小、创建时间、过期时间(默认 7 天) - 🔁 一键刷新:随时与 DeepSeek 云端同步
- 📋 复制 file_id:方便在请求或脚本中引用
- 🗑️ 删除文件:红色按钮 + 二次确认(3.5 秒内再点击才真正删除),防止误删
- 🎨 主题自适应:跟随 DSH 页面主题变量(
--dsw-*),深色/浅色皮肤均可 - 🔐 无密钥泄露:插件本体不含任何密钥;调用 DeepSeek Files API 时通过 DSH 的凭据服务(
DEEPSEEK_API_KEY)在宿主侧解析,浏览器页面只访问本机路由
前置条件
| 要求 | 说明 |
|---|---|
| DeepSeek Harness | dsh >= 0.1.0-rc.6(推荐 0.1.1-rc.2+,即官方适配器支持 Files API 的版本) |
| API Key | 已在 DSH 凭据中配置 DEEPSEEK_API_KEY(用于调用 https://api.deepseek.com/files) |
| Web Profile 目录 | $DSH_HOME/profiles/web/(Windows 默认 %USERPROFILE%\.dsh\profiles\web\) |
说明:本插件只管理通过 Files API 上传的文件(图片走 Files API 上传时产生)。纯文本对话、未经过 Files API 的内容不在此列。
安装
方式 A(推荐)∶一条命令安装
本插件是标准的 DSH bundle 包(package.json 声明 dsh.bundle.patch),可直接通过官方插件命令安装:
# 从 GitHub 直装(推荐,不需要 npm 账号)
dsh plugin --profile web add github:iskshadow195563/DeepSeek_Harness_Files_Panel#v1.1.0

# 或从 npm 安装
dsh plugin --profile web add deepseek-files-panel
--profile必填;换成你实际使用的 profile 名(web为默认 Web 界面 profile)。- 安装完成即加入 Profile 的 bundle 层;重启
dsh web后生效(与官方皮肤插件同机制)。- 本仓库带
dsh-plugintopic,可被 YELEBAI/dsh-plugin-marketplace 等社区插件市场自动扫描收录。
方式 B:手动安装(Windows / macOS / Linux 通用)
下载
dsf-files-panel.mjs(本仓库根目录,或 Release 附件),放入你的 Web profile 目录:# macOS / Linux($DSH_HOME 未设置时默认为 ~/.dsh) cp dsf-files-panel.mjs "${DSH_HOME:-$HOME/.dsh}/profiles/web/" # Windows PowerShell Copy-Item dsf-files-panel.mjs "$env:USERPROFILE\.dsh\profiles\web\"合并补丁:编辑同一目录下的
cordis.patch.yml,在顶层数组追加以下条目:- insert: - id: deepseek-files-panel name: ./dsf-files-panel.mjs?v=1- 若文件为
[]或不存在:直接粘贴上面整段; - 若已有其他
insert条目:把- id: deepseek-files-panel这一行追加到已有的insert列表中(?v=1用于破 ESM 缓存,升级插件时数字 +1)。
- 若文件为
保存即热生效(profile 补丁文件被实时监视,无需重启);若 5 秒内没生效,重启
dsh web。刷新浏览器页面(F5)——右侧中部会出现「📁 DeepSeek 文件」手柄。
方式 C:一键脚本
Windows(PowerShell)$dest = "$env:USERPROFILE\.dsh\profiles\web"
New-Item -ItemType Directory -Path $dest -Force | Out-Null
Invoke-WebRequest "https://raw.githubusercontent.com/iskshadow195563/DeepSeek_Harness_Files_Panel/main/dsf-files-panel.mjs" -OutFile "$dest\dsf-files-panel.mjs"
$patch = Join-Path $dest "cordis.patch.yml"
$entry = "`n- insert:`n - id: deepseek-files-panel`n name: ./dsf-files-panel.mjs?v=1"
if (Test-Path $patch) { Add-Content -Path $patch -Value $entry } else { $entry | Set-Content -Path $patch }
# 然后按 F5 刷新页面
DEST="${DSH_HOME:-$HOME/.dsh}/profiles/web"
mkdir -p "$DEST"
curl -fsSL "https://raw.githubusercontent.com/iskshadow195563/DeepSeek_Harness_Files_Panel/main/dsf-files-panel.mjs" -o "$DEST/dsf-files-panel.mjs"
{
echo
echo "- insert:"
echo " - id: deepseek-files-panel"
echo " name: ./dsf-files-panel.mjs?v=1"
} >> "$DEST/cordis.patch.yml"
# 然后刷新浏览器页面
使用
| 操作 | 说明 |
|---|---|
| 展开/收起 | 点击右侧手柄展开;点面板右上「▶」收起 |
| 刷新 | 标题栏「↻」按钮重新拉取云端列表 |
| 复制 ID | 每个文件的「复制 ID」按钮,复制 file-api-... |
| 删除 | 点「删除」→ 变红色「确认删除?」→ 3.5 秒内再点一次才会真正从云端删除 |
| 直达展开 | 浏览器地址栏加 ?dsf-open=1(如 http://127.0.0.1:3080/?dsf-open=1)自动展开 |
卸载
包形态(推荐安装方式)卸载:
dsh plugin --profile web remove deepseek-files-panel
文件型(手动安装)卸载:
- 从
$DSH_HOME/profiles/web/删除dsf-files-panel.mjs; - 从
cordis.patch.yml的insert列表中删除deepseek-files-panel那两行; - 刷新页面。
已上传到 DeepSeek 云端的文件不会因此删除;需要清理请在面板里删除,或调用
DELETE https://api.deepseek.com/files/{file_id}。
工作原理
浏览器页面 ──(同源 fetch)──> 本机 dsh web(/dsf-files/list, /dsf-files/delete)
│ ctx.credentials 解析 DEEPSEEK_API_KEY(不落页面)
▼
https://api.deepseek.com/files (GET 列表 / DELETE 删除)
- 宿主插件(
dsf-files-panel.mjs)注入页面脚本panel.js,并把Files API列表/删除路由挂在本机dsh web上; - 页面脚本只与本机通信,API Key 永不进入浏览器;
- 与 DeepSeek 官方 Files API 兼容;配合 DSH 0.1.1-rc.2+ 的官方适配器(图片经 Files API 上传并复用
file_id)效果最佳。
发布 Release(v1.x)
本仓库按 语义化版本 发布。发布步骤:
1. 提交并推送新版本
git add -A
git commit -m "feat: <本次改动>"
git push origin main
2. 打标签(推荐 v1.0.0 起)
git tag v1.0.0
git push origin v1.0.0
3. 创建 Release
方式 A —— GitHub CLI(推荐):
gh release create v1.0.0 \
--title "v1.0.0" \
--notes "• 右侧可折叠文件面板
• 列出 / 复制 / 删除 DeepSeek Files API 文件
• 主题自适应" \
./dsf-files-panel.mjs
方式 B —— GitHub 网页:
- 打开仓库页 → 右侧 Releases → Draft a new release;
Choose a tag→ 选择v1.0.0(或输入新标签自动创建);- 填写标题与说明(可参考下方模板);
- 把
dsf-files-panel.mjs文件拖入 Attach binaries 作为安装产物; - Publish release。
建议的 Release Notes 模板:
## 安装
下载 `dsf-files-panel.mjs`(本 Release 附件)→ 放入 `$DSH_HOME/profiles/web/`
→ 在 `cordis.patch.yml` 追加 insert → 刷新页面。
```yaml
- insert:
    - id: deepseek-files-panel
      name: ./dsf-files-panel.mjs?v=1
变更
- ...
### 版本策略

- `v1.0.0` 首次稳定发布;Bug 修复 `v1.0.1`;新功能 `v1.1.0`;
- 每次发布请同步更新插件内 `?v=` 数字(安装侧用于破 ESM 缓存)。

## 常见问题(FAQ)

| 问题 | 解决 |
|---|---|
| 右侧手柄没出现 | 确认 `.mjs` 在 profile 目录、补丁行已合并、`dsh web` 已加载(等待几秒)并 **F5 刷新页面** |
| 列表报「未配置 DEEPSEEK_API_KEY」 | 在 DSH 设置/Models 页配置该凭据 |
| 显示「HTTP 401/403」 | API Key 无效或过期 |
| 面板不跟随皮肤 | 请确认 DSH 页面提供 `--dsw-*` 主题变量(标准 DSH Web 均提供) |
| 删除后文件仍在列表 | 点「↻」刷新;云端删除是即时的,本地为已删条目 |

## 安全设计

- 插件不含任何密钥;密钥仅由 DSH 凭据服务在宿主进程内解析;
- 页面与 API 之间只经本机 `dsh web` 同源路由,不跨域;
- 删除操作带二次确认,避免误删云端文件;
- 已上传文件默认 7 天过期(过期时间由 DeepSeek 管理),过期前面板会显示剩余有效期。

## License

MIT License — see [LICENSE](LICENSE).

---

<p align="center">
  由 DSH 用户社区维护 · 与 DeepSeek 官方 API 兼容 · 图片上传复用见 <a href="https://api-docs.deepseek.com/zh-cn/guides/files_api/">DeepSeek Files API</a>
</p>
许可证选择
仓库将使用 MIT License。若你有其他偏好(如 Apache-2.0 / 专有),告诉我。
中文安装教程:从零到 Release 的完整版(也适合写进你自己的笔记)A. 首次把插件放上 GitHub(本仓库即为此例)
git init
git add .
git commit -m "initial release: deepseek-files-panel"
gh repo create deepseek-files-panel --public --source . --push
B. 别人如何安装(终极简化版)
- 打开本仓库 Release 页,下载附件的
dsf-files-panel.mjs; - 放进
$DSH_HOME/profiles/web/(Windows:%USERPROFILE%\.dsh\profiles\web\); - 在同目录
cordis.patch.yml的数组里追加:
- insert:
    - id: deepseek-files-panel
      name: ./dsf-files-panel.mjs?v=1
- F5 刷新页面,右侧出现「📁 DeepSeek 文件」手柄。
C. 以后每次发布新版本(3 条命令)
git tag v1.1.0 && git push origin v1.1.0
gh release create v1.1.0 --title "v1.1.0" --notes "变更: ..." ./dsf-files-panel.mjs
以及记得把补丁里的 ?v=1 → ?v=2(否则浏览器可能缓存旧脚本)。
No comments yet. Be the first to write one.