💬 dsh-multi-chat — Multi-chat, one screen
English | 中文






Run N conversations in DeepSeek Harness at once, watch every Agent's live progress side-by-side, and check in from your phone or tablet. One browser tab goes from "one conversation at a time" to "a panoramic multi-conversation cockpit."
Install a multi-window wall into the official DeepSeek Harness (DSH) Web UI: a grid that shows N running DSH conversation instances simultaneously (each instance runs its own task), so every Agent's live progress, chat, and output are visible at a glance — no more hopping between endless tabs and windows.
✨ What it does
| Capability | Description |
|---|---|
| 📺 Multi-window | One-click entry from the sidebar; the chat area becomes a window grid showing every task side-by-side, one pane per port |
| 🔍 Auto-discovery | Scans a port range to auto-find running DSH instances; manual management is also supported |
| ➕ One-click new window | Launch a brand-new DSH instance right inside the wall to grow your conversation matrix |
| 📱 Phone access | The "Phone access" button starts a built-in authenticated LAN gateway — open the URL on your phone, enter the token, and watch progress |
| 🛑 Window controls | Maximize, refresh, open in a new tab, stop an instance, and switch column count (auto/1/2/3/4/6) |
Multi-chat = multi-port. Start N
dsh web --port <n>instances (each running one conversation/task), open the wall from any of them, and you see all of them side-by-side.
📸 Screenshots
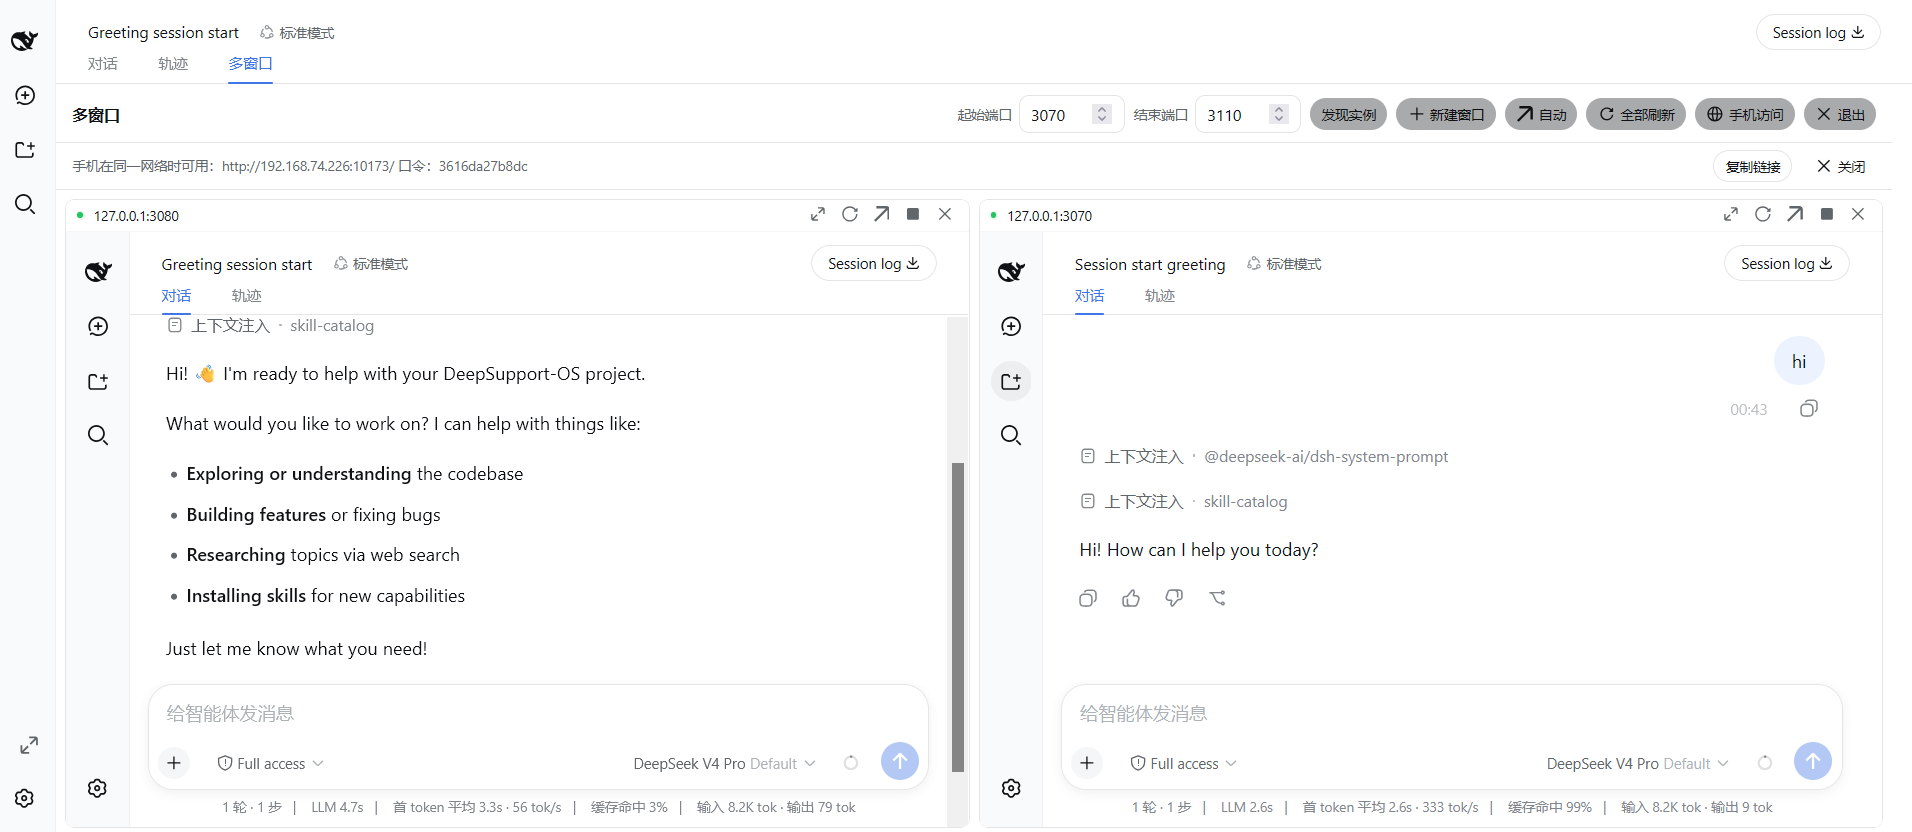
🖥️ Windows · Two chats side-by-side — two running DSH instances laid out together, each pane a full official conversation UI with live online status dots and per-window controls (maximize / refresh / new tab / remove):
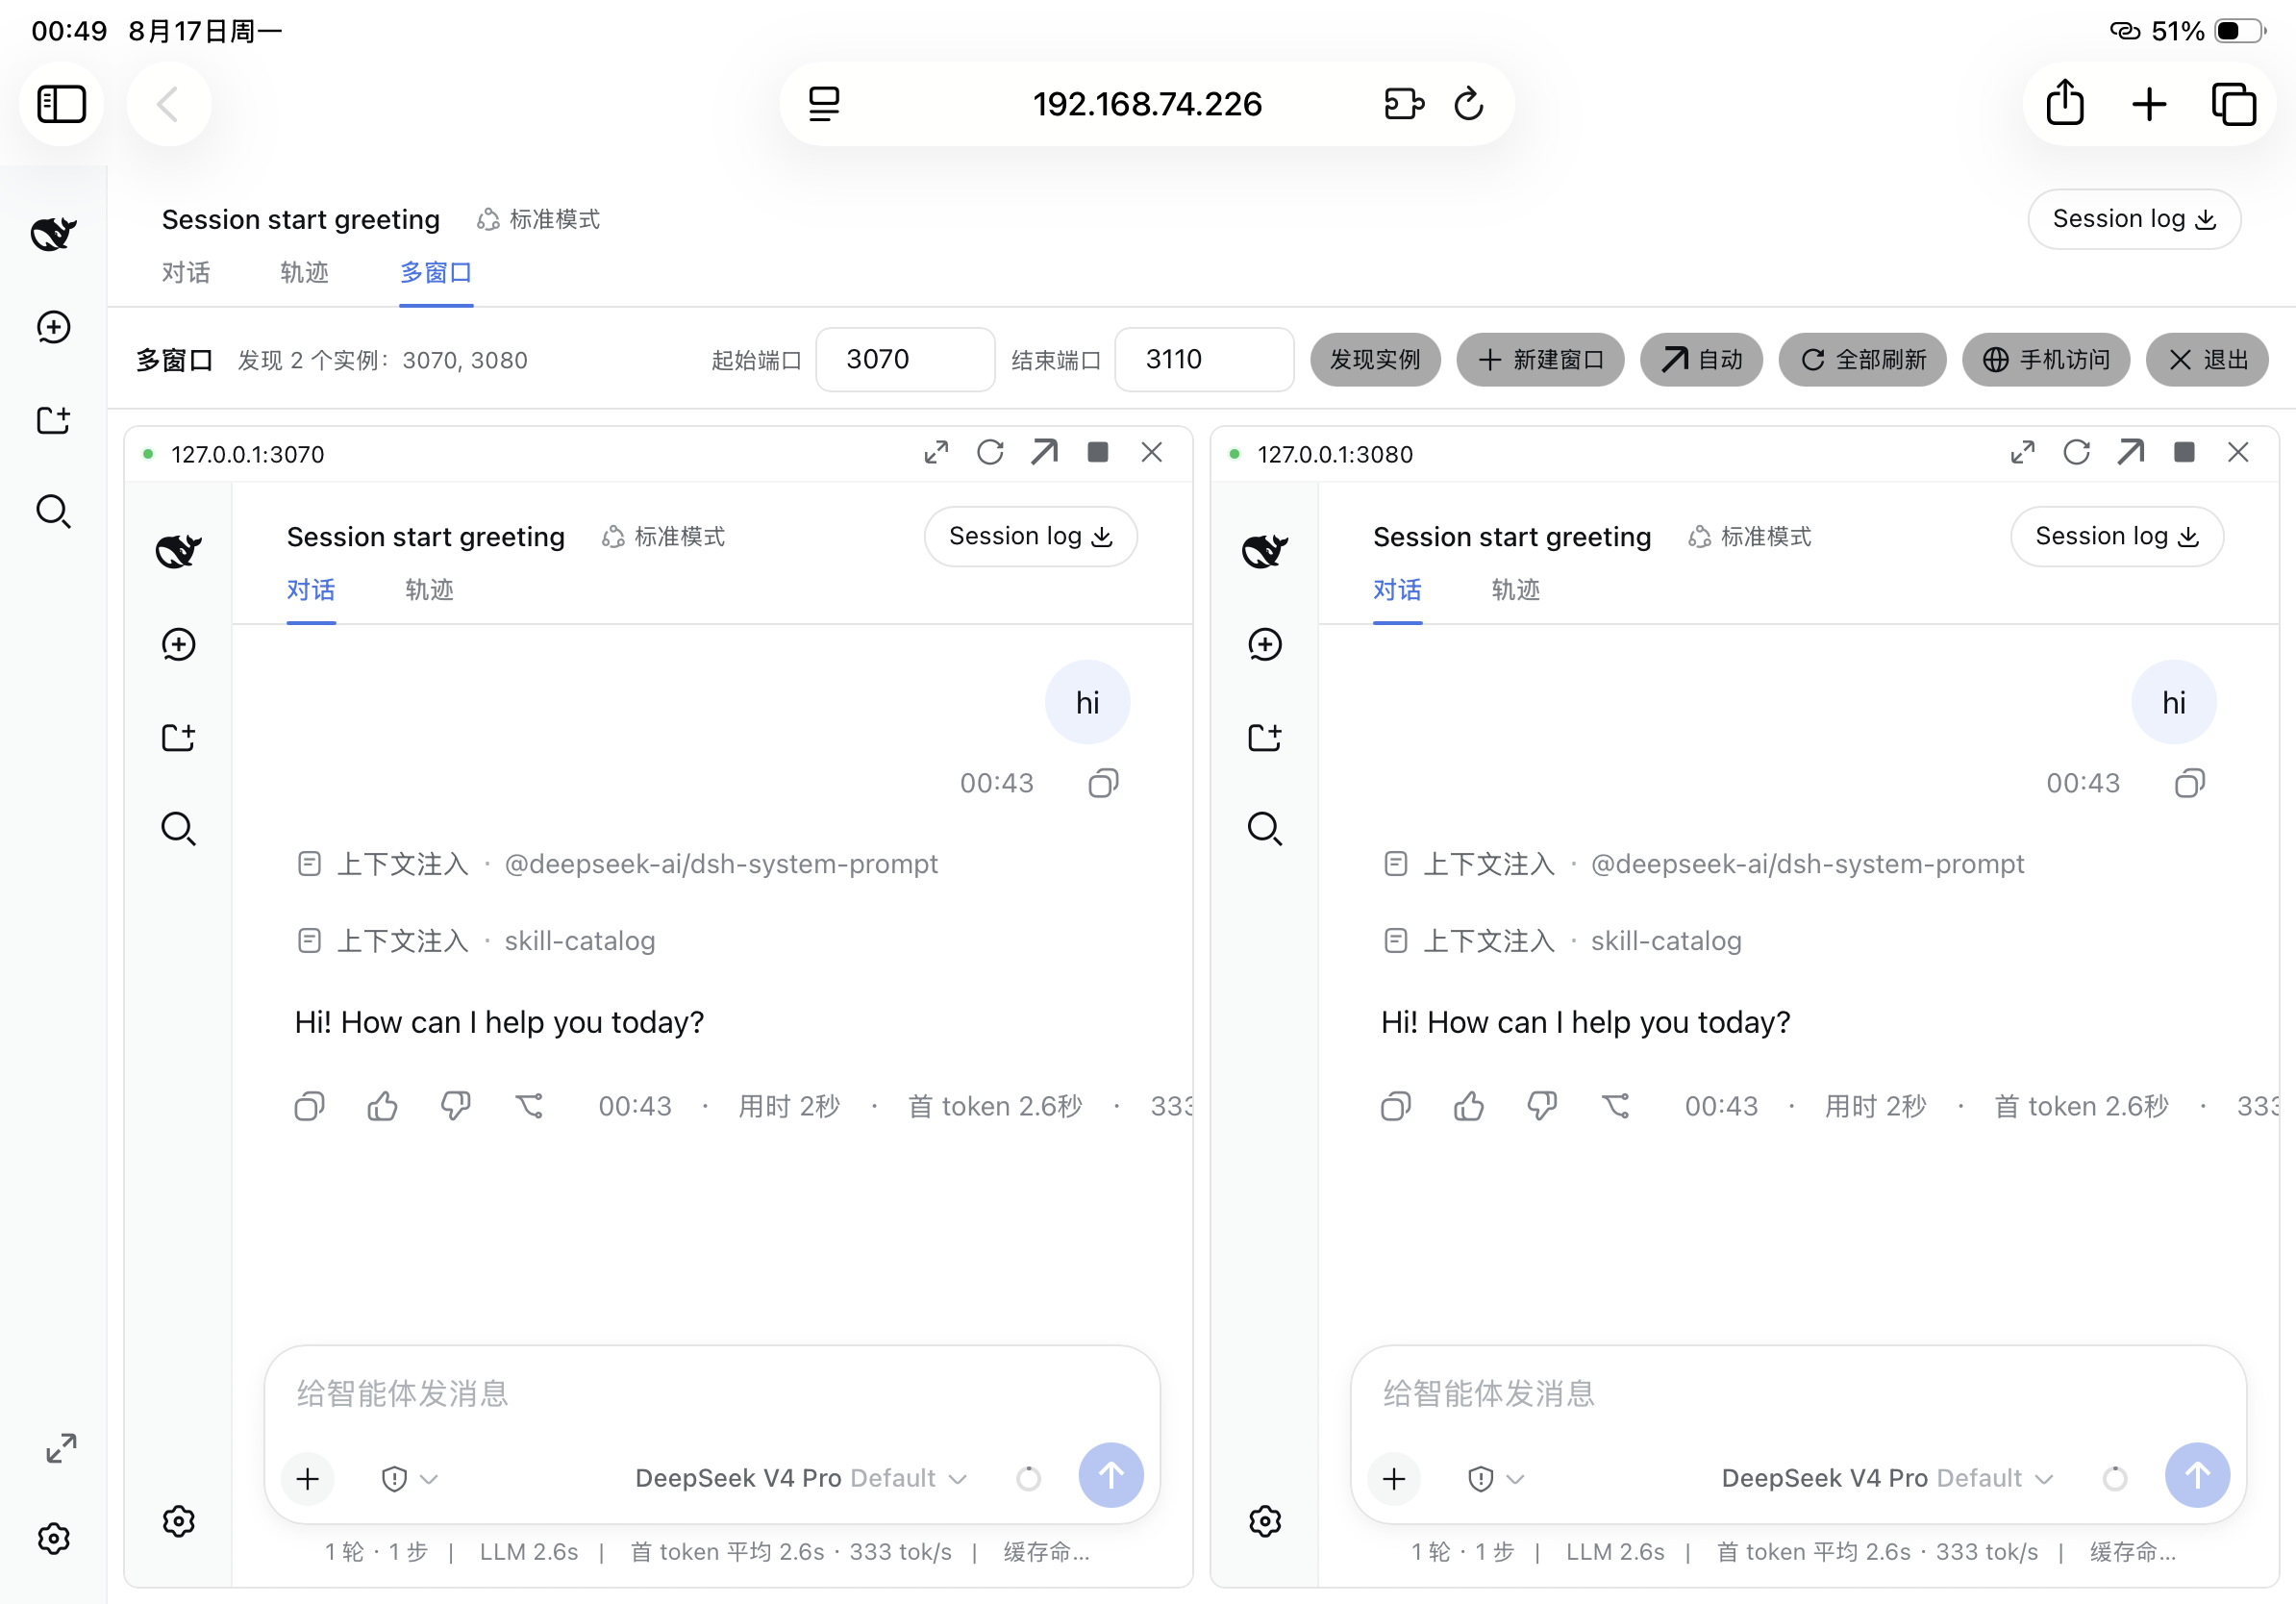
📱 iPad · Two chats on mobile — on the same LAN, open the token-authenticated gateway URL on an iPad to watch two Agents' live progress on one tablet screen:
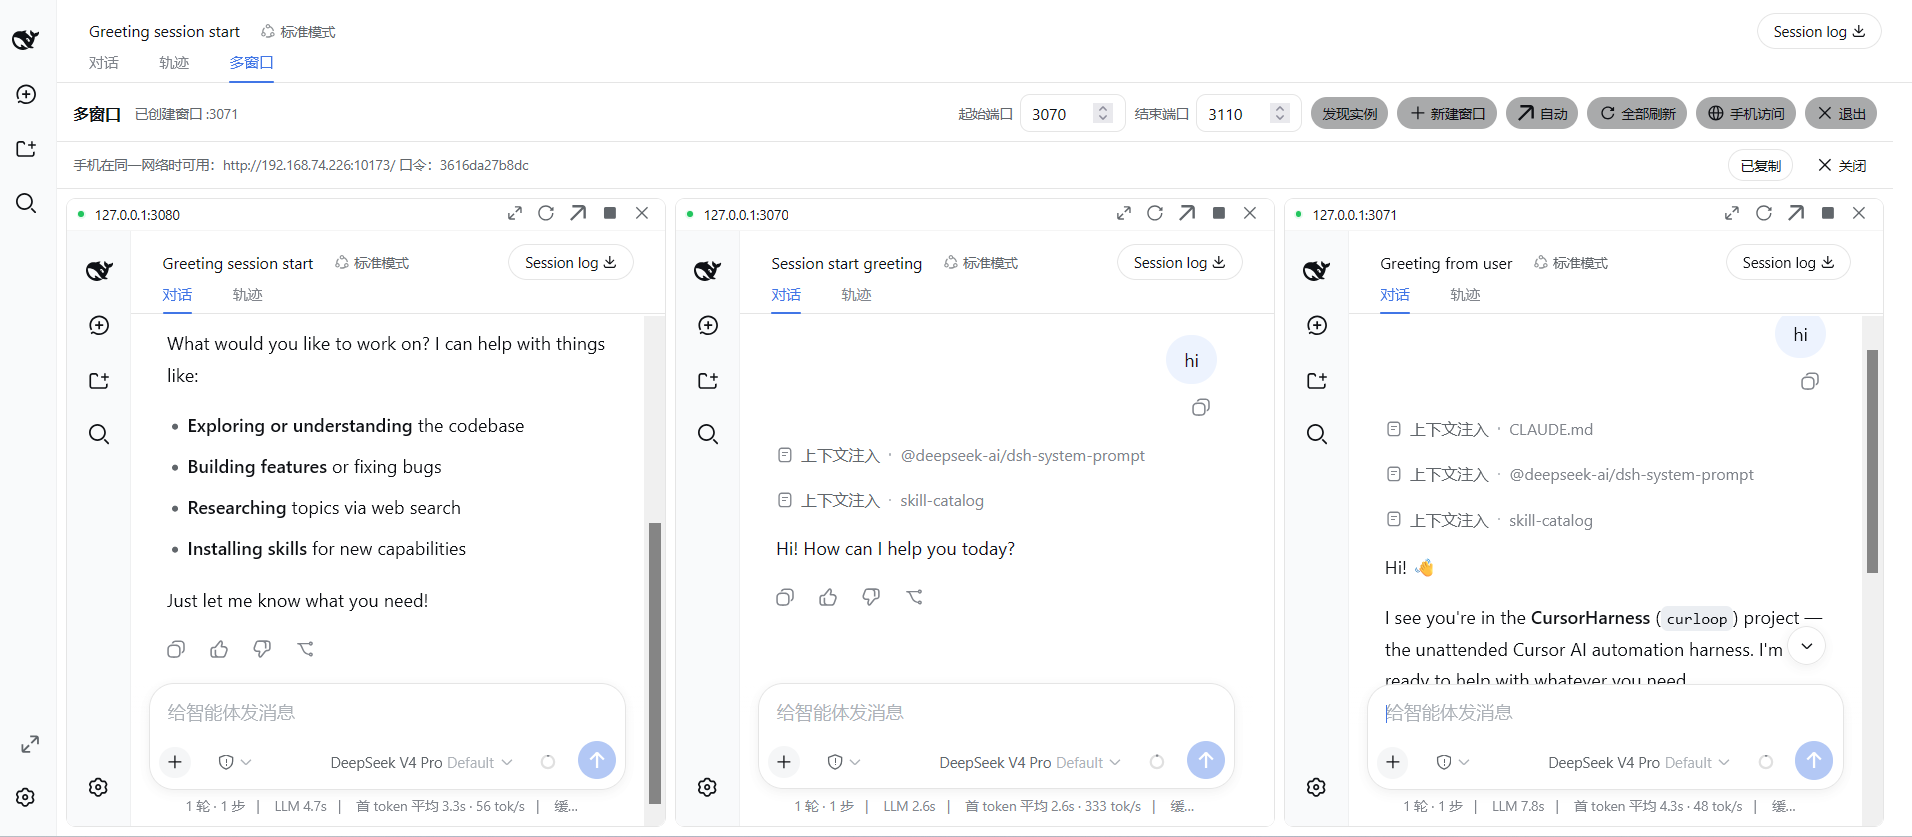
🖥️ Windows · Three-chat panorama — a 3-column grid of three running instances, all Agents on one screen, upgrading you from "one conversation at a time" to "a panoramic multi-conversation cockpit":
🚀 30-second quick start
# 1. Install — ONE command straight from the npm registry (no CLI to download):
dsh plugin --profile web add dsh-multi-chat

#    …or via the plugin's own npx CLI (packs a tarball and installs it):
npx dsh-multi-chat install

# 2. Start a few instances
npx dsh-multi-chat start --ports 3080,3081,3082

# 3. (Re)start any instance and click "Multi-window" in the sidebar footer → done 🎉
Why this approach
- No official logic is touched: the plugin only registers two additive list slots (
conversation.viewring entry,sidebar.footer.actionsidebar shortcut) and five read-only JSON routes (/multi/api/ports,/multi/api/status,/multi/api/stop,/multi/api/create,/multi/api/link). No existing slot is replaced, no line is rewritten, and no core session/agent/tool logic is touched. - The UI is the official UI: the wall is a view in the official view ring rendered inside the chat panel (not a popup). Theme, type scale, icons, and controls all use the official
--dsw-*tokens and official primitives (Button/Input/Menu/StateDot). - Recursion guard: the wall never embeds its own port; embedded pages carry a
?multi-wall=embedflag and register no wall UI, preventing infinite "wall-in-wall" recursion. - Minimal footprint: one declarative client plugin package — it ships its own
dsh.bundle.patch+cordis.patch.yml, so DSH mounts it as a bundle layer automatically.
Directory layout
dsh-multi-chat/                    # single-package structure
  lib/                             # built artifacts (lib/index.js + lib/client.js + types)
  src/                             # source (node half + browser half)
  bin/dsh-multi-chat.mjs           # cross-platform npx CLI (install/start/stop/gateway)
  scripts/
    install-plugin.ps1             # pack + install into profile (DSH auto-mounts the bundle)
    start-multi.ps1 / stop-multi.ps1 # start/stop multiple dsh web instances
    gateway.mjs                    # token-authenticated reverse-proxy gateway (phone/remote)
  cordis.patch.yml                 # DSH bundle layer declaration
  harness-src/                     # official deepseek-harness source (dev/build reference)
Install & enable (Windows)
# 1) Pack and install into the web profile. The plugin declares dsh.bundle.patch,
#    so DSH auto-mounts its bundle layer — no manual patch edit.
.\scripts\install-plugin.ps1

# 2) Restart dsh web and open any instance
dsh web --port 3084
# Browser: http://127.0.0.1:3084 — a "Multi-window" button appears in the sidebar footer
Or manual:
npm pack                                                  # produce a tarball (dsh-multi-chat-1.0.3.tgz)
dsh plugin --profile web add dsh-multi-chat-1.0.3.tgz     # DSH adds the package to the bundle layer stack automatically
Uninstall (one command, nothing manual to clean up — restart dsh web to unload it):
dsh plugin --profile web remove dsh-multi-chat
Usage
- Start several instances:
.\scripts\start-multi.ps1 -Ports "3080,3081,3082,3084"(or manualdsh web --port <n>). - Open any instance and click the "Multi-window" shortcut in the sidebar footer (or the "Multi-window" tab at the top of the chat area).
- Inside the wall view: auto-discovery (own port excluded), column switching (auto/1/2/3/4/6, horizontally filled by default), click title to maximize, ⟳ refresh one, ↗ open in a new tab, ✕ remove from view, refresh all, and live online status dots. The layout is persisted to
localStorage. - To exit the wall, click the "Exit" button in the toolbar's top-right to switch back to the chat view in one click.
Phone / remote access (built-in authenticated gateway)
The official dsh web deliberately forbids --host 0.0.0.0 (it would expose remote code execution to the network). This plugin ships a built-in token-authenticated intranet gateway: click the "Phone access" button and it automatically starts a gateway for the current instance (listening on 0.0.0.0, reverse-proxying to 127.0.0.1:<this instance's port>), returning a LAN URL + login token.
Click "Phone access" → you get:
  Available on your phone on the same network: http://10.105.7.204:9477  token: 2efb23eade16
Open that URL on your phone and enter the token to reach the full DSH UI. The gateway's security model:
- HMAC-signed HttpOnly/SameSite session cookie (12h default),
?token=for script convenience, per-IP rate limiting on failed logins - All proxied requests rewrite Host/Origin to the loopback target, so the official
/apibrowser-trust fence (the DNS-rebinding defense) treats it as a local request — no restart /--trusted-hostneeded - WebSocket upgrades and SSE streams pass through unchanged
- When the intended port hits a Windows excluded range or is already bound, it automatically falls back to an OS-assigned free port
A standalone
scripts/gateway.mjs(with optional TLS) is also available for advanced manual use.
Distribution & install
dsh-multi-chat is published to npm (unscoped public package) and released on GitHub (source zip/tarball per tag). Every channel below ends in the same three things: the package lands as a dependency of the web profile, DSH reconciles it into the bundle layer stack (the package declares dsh.bundle.patch, so its own cordis.patch.yml is mounted automatically — no manual patch edits), and a dsh web restart loads the wall.
Install / uninstall cheat-sheet
| Channel | Install | Uninstall |
|---|---|---|
| One-command (registry) | dsh plugin --profile web add dsh-multi-chat |
dsh plugin --profile web remove dsh-multi-chat |
| npx (no download) | npx dsh-multi-chat install |
dsh plugin --profile web remove dsh-multi-chat |
| Global CLI (npm) | npm i -g dsh-multi-chat then dsh-multi-chat install |
dsh plugin --profile web remove dsh-multi-chat then npm rm -g dsh-multi-chat |
| Tarball (offline) | npm pack → dsh plugin --profile web add ./dsh-multi-chat-1.0.3.tgz |
dsh plugin --profile web remove dsh-multi-chat |
| Git clone | node bin/dsh-multi-chat.mjs install |
dsh plugin --profile web remove dsh-multi-chat |
dsh plugin --profile web remove dsh-multi-chatis the single uninstall command for every channel: it removes the dependency from the profile, and DSH strips it from thedsh.profile.bundleslayer stack automatically (reconciled from the installed dependency set — seedsh plugin --help). Restartdsh webafterwards to unload the wall.
pnpm ≥ 11 gotcha: pnpm 11's
minimumReleaseAgesupply-chain guard skips freshly published versions (default cutoff: 1 day) and silently installs the newest "aged" release instead. Ifdsh plugin --profile web add dsh-multi-chatreports an older version than the latest, addminimumReleaseAge: 0to the profile's~/.dsh/profiles/web/pnpm-workspace.yamland re-run the add. The bundled CLI (npx dsh-multi-chat install) writes that setting for you automatically.
The repo also bundles a cross-platform CLI, dsh-multi-chat (bin/dsh-multi-chat.mjs). Its install command probes $DSH_HOME (default ~/.dsh), packs the package into the profile's plugins/ folder, and runs dsh plugin --profile web add <tarball> (same behavior as install-plugin.ps1).
Channel 1: npm / npx (recommended, easiest)
# Published on npm — one line installs on any machine (node + pnpm required)
npx dsh-multi-chat install

# Or install the CLI globally, then install the plugin from anywhere
npm i -g dsh-multi-chat
dsh-multi-chat install

# Or run single commands straight from npx (no plugin install needed)
npx dsh-multi-chat start --remote --token <token> --ports 3080,3081
npx dsh-multi-chat gateway --target 127.0.0.1:3080 --token <token>
Maintaining / republishing (maintainer): npm publish (unscoped public package dsh-multi-chat).
Channel 2: GitHub Release
Download the source zip/tarball from Releases, unpack it, and cd in:
node bin/dsh-multi-chat.mjs install           # pack + dsh plugin add (see cheat-sheet)
node bin/dsh-multi-chat.mjs start --ports 3080,3081
Tagging a release makes GitHub auto-generate the source zip/tarball assets; you can also attach a
npm pack-produced.tgzas an offline install bundle.
Channel 3: direct git install
git clone https://github.com/daetz-coder/dsh-multi-chat.git
cd dsh-multi-chat

node bin/dsh-multi-chat.mjs install           # pack + dsh plugin add (see cheat-sheet)
node bin/dsh-multi-chat.mjs start --ports 3080,3081
node bin/dsh-multi-chat.mjs gateway --target 127.0.0.1:3080 --token <token>
For the one-command-on-this-machine flow,
dsh plugin --profile web add dsh-multi-chatalso works straight from a git clone — install the plugin from the repo checkout without packaging it yourself.
Running straight from this repo (development)
node bin/dsh-multi-chat.mjs install
node bin/dsh-multi-chat.mjs start --ports 3080,3081
node bin/dsh-multi-chat.mjs stop
node bin/dsh-multi-chat.mjs gateway --target 127.0.0.1:3080 --token <token>
🔍 Discovery & ecosystem
This plugin follows the official DeepSeek Harness client plugin spec:
- Be found in the GitHub plugin ecosystem: adding the
dsh-plugintopic to this repo makes it searchable on the officialdsh-plugintopic page (the officially recommended third-party discovery path). - Bilingual technical docs: this repo ships
README.md(English) andREADME.zh.md(Chinese) at the root, matching the bilingual convention of officialpackages/client/*plugins. - Purely additive, no core touching: registers only the
conversation.view/sidebar.footer.actionlist slots +/multi/api/*read-only routes, changing no official core logic.
Building from source
The single-package layout uses tsdown for bundling and tsc for type declarations:
npm install
npm run build          # tsc + tsdown → lib/
npm test               # vitest (browser half in jsdom + node half)
Testing
The unit suite (tests/browser-plugin.client.spec.tsx, 20 specs) exercises the
browser half (view-ring entry, sidebar shortcut, wall store, recursion guard,
HMR disposal) against a real cordis Context in jsdom, plus the node half
(probe routes, config schema, stop semantics).
The specs import @deepseek-ai/* platform packages whose published versions
lag the snapshot this plugin was written against, so tests resolve them to the
vendored harness sources in harness-src/ instead of npm:
First install the vendored workspace once (it is a full DSH checkout):
cd harness-src && pnpm install && cd ..tsconfig.vitest.jsoncarries the workspace'stsconfig.base.jsonpaths map (rewritten with aharness-src/prefix) so every@deepseek-ai/*import resolves to sources — never to unbuiltlib/outputs. Regenerate it after updating the vendored checkout:node scripts/sync-vitest-paths.mjsvitest.config.tsfeeds that map tovite-tsconfig-pathsand dedupesreact/react-domso the component specs and@testing-library/reactshare one React instance. Then:npm test
npm run build'stscstep resolves@deepseek-ai/*types from the installed workspace (or from npm-installed versions on a machine with the matching snapshot); the committedlib/is the reference output.
License
MIT
还没有评论,来写第一条。