dsh-video-merger
Merge every folder's videos into one file — without changing the video spec.
A DeepSeek Harness plugin that scans a folder
tree, groups the videos by folder, and writes one merged video per folder. When
the clips in a folder already share the same codec, resolution, frame rate,
pixel format, and audio layout, the merge is a lossless remux (-c copy).
Only mixed folders are normalized, and then to the first clip's spec.
按文件夹合并视频:每个包含至少 2 个视频的文件夹生成一个合并文件。规格一致时 无损拼接、不重新编码;规格不一致时才转码对齐到第一个视频。



Contents
- Features
- Requirements
- Install
- Usage
- Screenshots
- Output rules
- How it works
- ffmpeg resolution
- Development
- Limitations
- Troubleshooting
- License
- 中文说明
Features
- Folder-aware. Recursively scans a root folder, groups clips per folder, and merges every folder with at least two videos. Natural file-name ordering.
- Lossless by default. Matching clips are concatenated with the ffmpeg concat demuxer and stream copy. No quality loss, no re-encode, same container.
- Automatic fallback. Mixed resolutions, frame rates, codecs, or audio layouts are normalized to the first clip, then concatenated.
- Optional unified output. Put every result in one folder (defaults to the scanned root), or keep the original per-folder layout.
- Web UI. In-app directory browser, folder checklist, live progress, speed, ETA, cancel, play, and reveal in file manager.
- Two more entry points. The
merge_folder_videosDSH tool and a standalone CLI, both using the same engine. - ffmpeg bootstrap. Detects an existing install; on Windows the UI can download a known-good build.
Requirements
- DeepSeek Harness with the Web UI (desktop or browser profile).
ffmpegandffprobefor the actual merge. Put them onPATH, point the plugin at their folder, or use the Windows auto-download.- Node.js 20+ only if you use the CLI or run the tests.
Install
Clone this repository somewhere stable, then install the folder as a DSH bundle.
In DSH, call the plugin_manager tool:
plugin_manager install_bundle target = <absolute path to dsh-video-merger>
For example:
git clone https://github.com/a-mochis/dsh-video-merger.git
plugin_manager install_bundle target = E:\code\6-plugins\dsh-video-merger
Or download the packaged zip from the latest release, unzip it, and install the extracted folder the same way.
After installing or updating, force-refresh the Web UI (Ctrl+Shift+R). Open any
session and choose the 视频合并 / Video Merge tab in the session tab bar.
Install from Discover
The repository also publishes a one-plugin market index. In DSH open Plugins → Discover → Index sources → Add index source and paste:
https://cdn.jsdelivr.net/gh/a-mochis/dsh-video-merger@main/market/index.json
The Video Merger card then appears in Discover and installs the same bundle. This is a personal index hosted beside the project, not an entry in the curated community catalog. See docs/marketplace.md for the release/update checklist.
The plugin has no runtime npm dependencies.
npm installis only needed for the client tests (react/react-domare dev dependencies).
Usage
Web UI
- Open the 视频合并 tab.
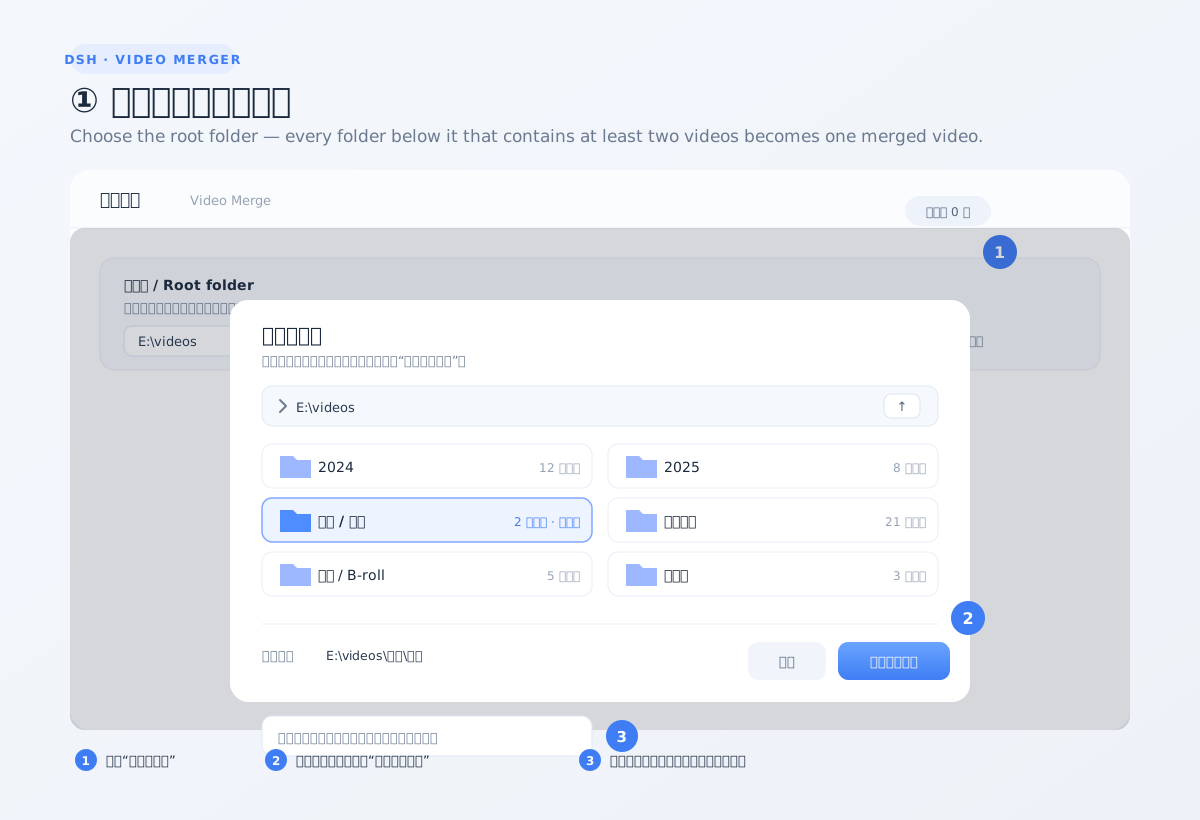
- Choose a root folder. The built-in browser supports entering folders, going up, and typing a path directly. Click 选择此文件夹 to confirm.
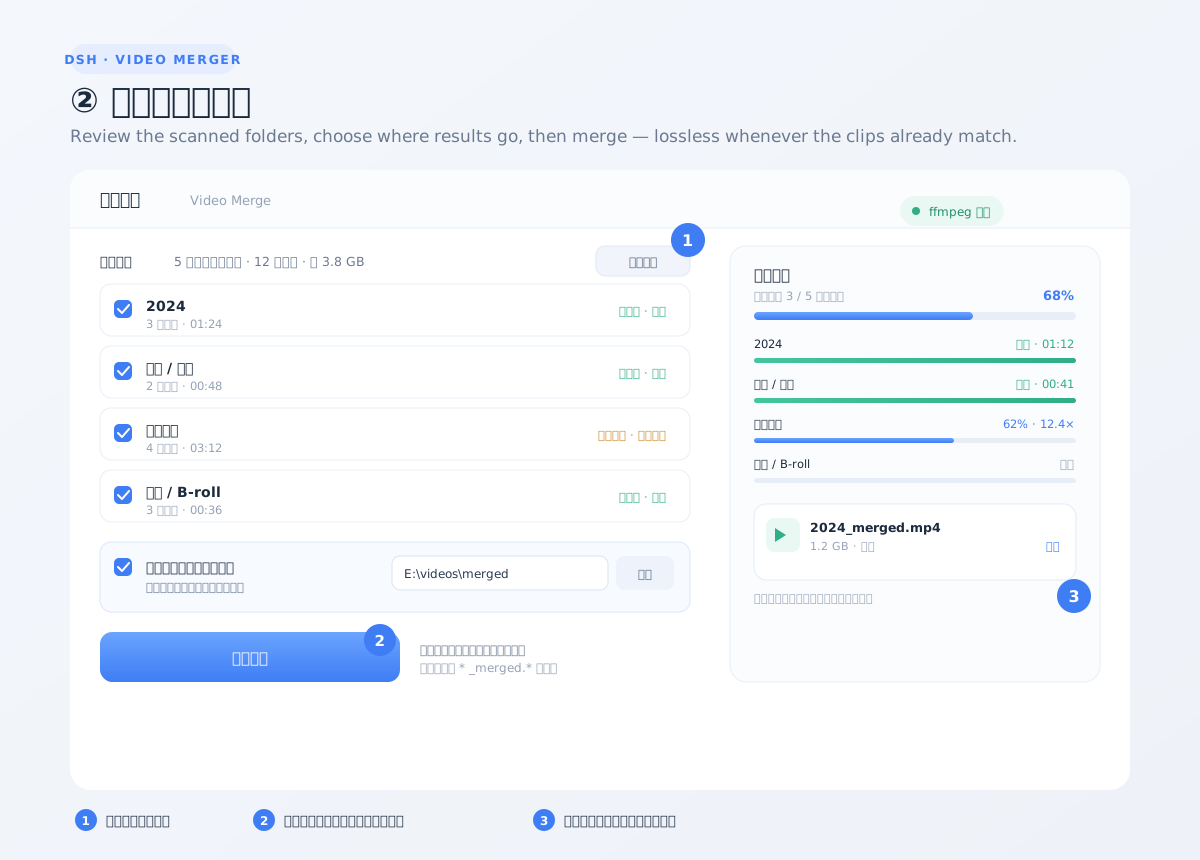
- Review the folder list and uncheck anything you do not want to merge. Expand a folder to inspect clip order.
- Leave 统一输出到同一个文件夹 checked to collect all results in one place (the output path defaults to the scanned root), or uncheck it to write each result back into its source folder.
- Click 开始合并. Progress, speed, and ETA are shown per folder and overall.
- Play the result or reveal it in the file manager when the job finishes.
Screenshots
1. Choose the root folder. Click 选择文件夹 / Select folder, browse into the target folder in the built-in browser, then click 选择此文件夹 / Select this folder. The path is filled back and scanned automatically.
2. Review and merge. Check the folders you want, leave 统一输出到同一个文件夹 checked to collect every result in one place (the root by default), then click 开始合并 / Start merge. Progress, speed, and the finished output are shown per folder.
Tool
merge_folder_videos root="E:\videos" recursive=true outputDir="E:\videos\merged"
| Argument | Default | Meaning |
|---|---|---|
root |
required | Root directory to scan. |
folder |
– | Merge only this folder instead of scanning root. |
recursive |
true |
Scan sub-folders. |
order |
name |
Clip order: name or mtime. |
overwrite |
false |
Overwrite an existing output instead of auto-renaming. |
reencodeFallback |
true |
Normalize folders whose clips have different specs. |
deleteSource |
false |
Delete source clips after a successful merge. |
outputDir |
– | Put every result in this folder (created if missing). |
wait |
true |
Wait for completion; false returns a job id immediately. |
CLI
node bin/merge-videos.mjs "E:\videos" --out "E:\videos\merged"
--no-recursive        scan only the root folder
--folder <path>       merge only this folder
--order name|mtime    clip order (default: name)
--out <dir>           unified output folder
--overwrite           overwrite existing *_merged output
--no-reencode         skip folders whose clips have mismatched specs
--delete-source       delete source clips after a successful merge
--ffmpeg <dir>        directory containing ffmpeg and ffprobe
--json                print the final job snapshot as JSON
Exit codes: 0 all succeeded, 1 at least one failure, 2 bad arguments,
3 ffmpeg/ffprobe not found.
Output rules
- Name:
<folder>_merged.<original extension>. - Unified mode uses the folder's path relative to the scan root as a prefix, so
root/a/b/becomesa_b_merged.mp4instead of colliding withroot/a/. - Reserved Windows characters are replaced with
_; an empty name becomesmerged. - Existing outputs are auto-renamed with
(1),(2), … unless overwrite is on. - Files matching
*_merged.*are ignored on the next scan, so you can safely scan the same tree again. - The source clips are never deleted unless
deleteSource/--delete-sourceis set.
How it works
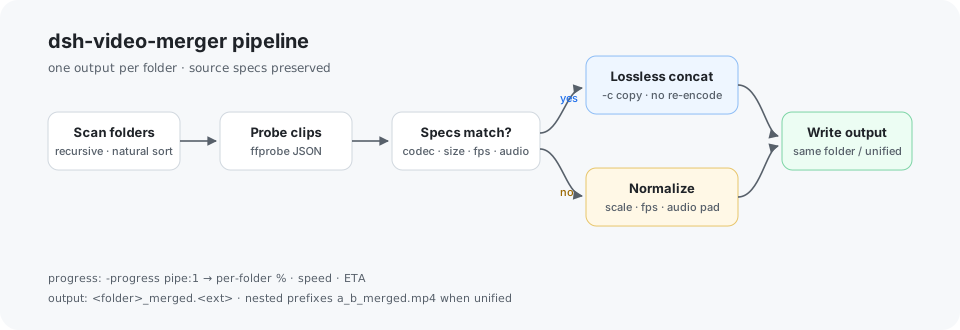
scan folders → ffprobe every clip → compare signatures
                                    ├─ equal   → concat demuxer + -c copy
                                    └─ unequal → normalize to first clip
                                                 (scale/pad/fps/yuv420p/audio)
                                              → concat demuxer + -c copy
The signature used for the comparison is:
video: codec | width | height | pixel format | frame rate
audio: codec | sample rate | channels        (or "no audio")
- Lossless path:
-f concat -safe 0 -i list -map 0:v:0 -map 0:a? -c copywith-fflags +genpts -avoid_negative_ts make_zero. - Normalize path: scales and pads to the target size, converts to
yuv420p, forces the target frame rate, encodes H.264 (libx264,veryfast, CRF 18) and AAC 192 kbps. A silent track is generated when the target has audio but a clip does not. - Progress comes from
-progress pipe:1 -nostats(out_time_usandspeed).
ffmpeg resolution
Checked in this order:
- The folder configured in the plugin (Web UI → 指定 ffmpeg 目录).
FFMPEG_DIR, thenFFMPEG_PATH.%DSH_HOME%/plugin-data/dsh-video-merger/bin(managed download).- Directories on
PATH. - A few common install locations.
The configuration file is
%DSH_HOME%/plugin-data/dsh-video-merger/config.json ($DSH_HOME or ~/.dsh
when the variable is unset). The detection result is cached for 15 seconds.
The in-app download is Windows-only and fetches the gyan.dev "essentials" build. On macOS/Linux install ffmpeg with your package manager, for example:
brew install ffmpeg          # macOS
sudo apt install ffmpeg      # Debian / Ubuntu
Development
npm install
npm run check       # node --check for every runtime file
npm test            # directory-listing normalization + React SSR
npm run test:merge  # generates synthetic clips, merges them, asserts specs
npm run test:merge creates test/fixtures/ and test/output/ with ffmpeg
lavfi sources (two identical clips, mixed resolutions, Matroska, an apostrophe
in the file name, missing audio, and a single-clip folder). Both directories are
git-ignored; no test media is committed.
The client tests load lib/client.js through the same
window.__ModuleLoader__ wrapper the Harness uses. If React is not installed
locally, set DSH_PROFILE_PACKAGE to a DSH profile's package.json path.
See CONTRIBUTING.md for the development install flow and PR expectations.
Limitations
- A folder needs at least two videos; a single clip is skipped.
- "Lossless" requires an exact signature match. Otherwise the folder is re-encoded once, which is inherently lossy.
- Subtitles, chapters, and per-clip metadata are not specifically preserved.
- Merging very large folders needs temporary disk space roughly equal to the output size.
- Auto-download of ffmpeg is Windows-only.
Troubleshooting
“ffmpeg not found”. Install ffmpeg and ffprobe and put them on PATH, or set
ffmpegDir in the plugin settings / merge_folder_videos call. The Web UI shows
the resolved binary under the status card; on Windows the Download ffmpeg
button installs the official essentials build into the plugin data directory.
“No folders with at least two videos”. The scan skips single clips and
outputs ending in _merged. Pick the parent folder, not one clip's folder.
A folder is marked “混合规格·自动转码”. The clips differ in resolution, frame rate, pixel format, or audio layout. The first clip is the target; the folder is re-encoded to it before concatenation. Turn off the normalization option to make the job fail instead.
A merge fails midway. The per-folder error is shown in the list and in the tool result. The temporary concat list and partial output are removed. Re-run with Overwrite enabled; the job is resumable per folder, not per clip.
The page shows the old UI after an update. Force-refresh with
Ctrl+Shift+R (macOS Cmd+Shift+R); a client bundle is cached per page load.
License
MIT © 2026 a-mochis
中文说明
功能
- 递归扫描根目录,每个含至少 2 个视频的文件夹合并成一个文件。
- 规格一致时使用 concat demuxer +
-c copy,无损、不重新编码。 - 规格不一致时(默认开启)以第一个视频为基准转码对齐,再拼接;缺失音轨的片段 会补静音。
- 可把所有结果统一输出到一个文件夹(默认扫描根目录),也可以保持写回各源文件夹。
- Web UI 支持目录浏览、文件夹勾选、实时进度、取消、播放和定位。
- 同时提供
merge_folder_videos对话工具和bin/merge-videos.mjs命令行。
安装
git clone https://github.com/a-mochis/dsh-video-merger.git
在 DSH 中调用:
plugin_manager install_bundle target = <dsh-video-merger 的绝对路径>
The profile package can also be installed from a terminal with the DSH CLI:
dsh plugin --profile desktop add git+https://github.com/a-mochis/dsh-video-merger.git
plugin_manager install_bundle additionally enables the bundle in the profile;
after a bare dsh plugin add, make sure dsh-video-merger is listed under
dsh.profile.bundles in the profile's package.json.
安装或更新后强制刷新页面,在会话顶部打开「视频合并」。
使用
- 图形界面:选根目录 → 勾选文件夹 → 按需勾选「统一输出」→ 开始合并。
界面示意
1. 选择根目录:点「选择文件夹」,在插件自带的目录浏览器中进入目标文件夹, 再点「选择此文件夹」。路径会回填并自动扫描。
2. 核对并合并:勾选要处理的文件夹;「统一输出到同一个文件夹」默认勾选, 留空即输出到扫描根目录;点「开始合并」后可查看总进度、速度和结果。
- 工具:
merge_folder_videos root="E:\videos" outputDir="E:\videos\merged"。 - 命令行:
node bin/merge-videos.mjs "E:\videos" --out "E:\videos\merged"。
输出命名 <文件夹名>_merged.<原扩展名>;统一输出时嵌套目录会带相对路径前缀
(如 a_b_merged.mp4),重名默认自动加 (1),勾选覆盖则直接覆盖。
测试
npm install
npm test
npm run test:merge
测试会用 ffmpeg 的 lavfi 现场生成素材,覆盖同规格、混合分辨率、MKV、文件名
带单引号、缺音轨和单视频文件夹。
许可
MIT © 2026 a-mochis
No comments yet. Be the first to write one.